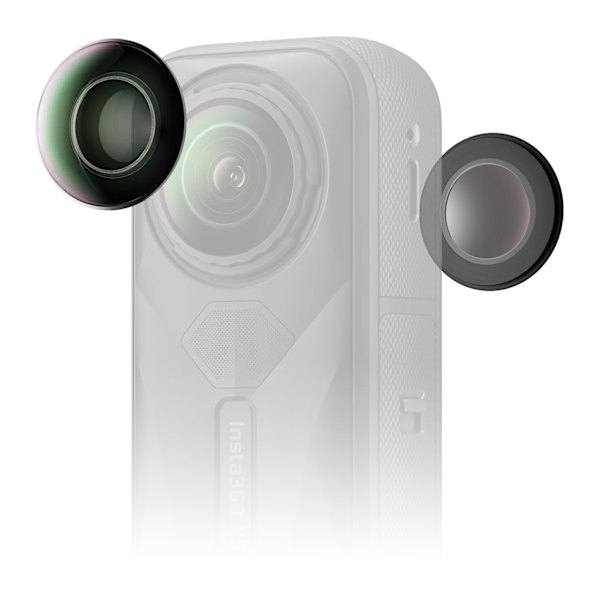
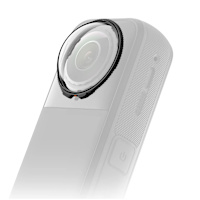
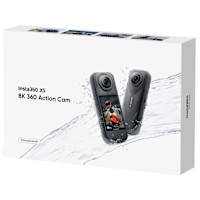
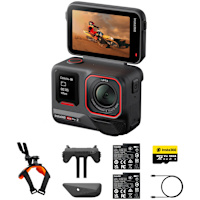
Insta360 X5 Replacement Lens Kit (Double Lens)
A pair of easy to install replacement lenses for the X5 action camera
DetailsRRP
£41.99
Select an option
Online
In-store
Seen it cheaper?
Get a price match
Get a price match
FREE delivery & returns
Quick find: 2647524

Description
Manufacturer
Insta360 X5 Replacement Lens Kit (Double Lens)
- Handy kit to easily remove and replace the outer lenses of Insta360 X5 on the go
- Completely replaceable lenses mean no more worrying about accidental damage and no waiting around for repairs
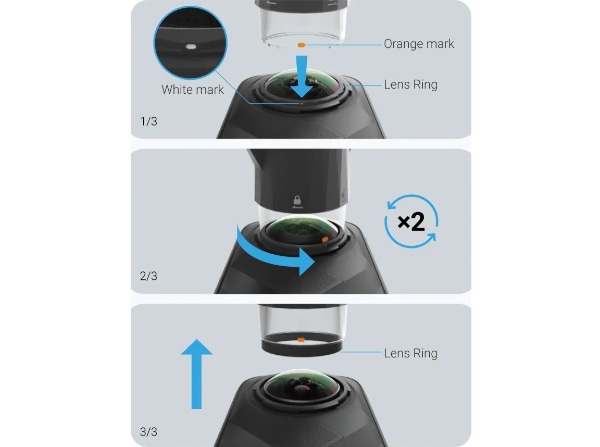
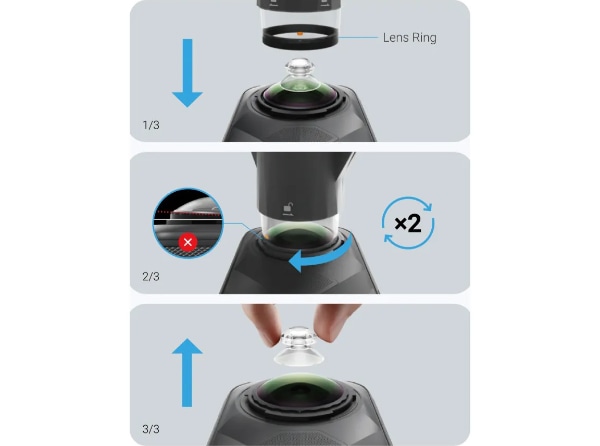
Step 1 - Remove The Lens Ring
Align the orange mark on the lens grip tool with the white mark on the lens ring.
Rotate the lens grip tool twice counter clockwise until the lens ring is loose.
Lift the lens grip tool to remove the lens ring.
Note: If the lens ring slips from the lens grip tool, place it back and ensure the orange and white marks are aligned.
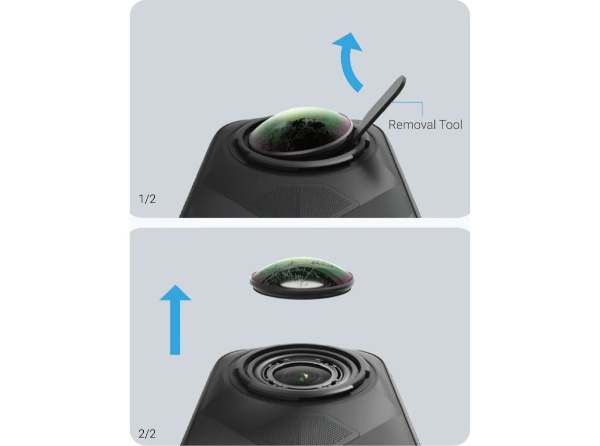
Step 2 - Remove The Lens
Use the removal tool to gently lift the edge of the old lens and remove it.
Note: If the rubber seal around the inner lens comes loose, place it back in its original position before continuing.
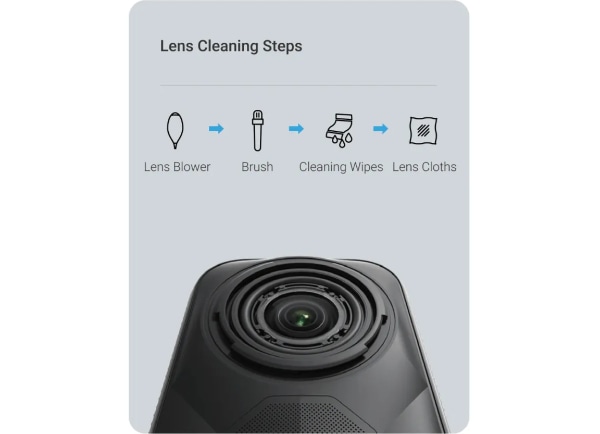
Step 3 - Check The Lens Is Clean
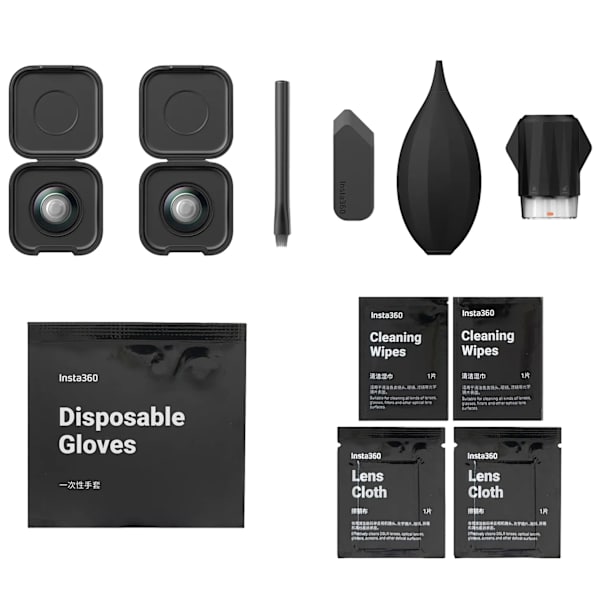
Ensure the inner lens is clean from dust, dirt, or debris. If needed, use the included lens blower, brush, cleaning wipes and lens cloth to clean it.
Step 4 - Replace The Lens
Pinch the suction cup with your fingers to pick up the new lens from the lens case and install it.

Step 5 - Install The Lens Ring
Align the lens ring with the camera and rotate the lens grip tool twice clockwise to install.
Remove the suction cup once the lens ring is installed.
Note: Make sure to use the corresponding lens rings for the front and rear camera lenses.
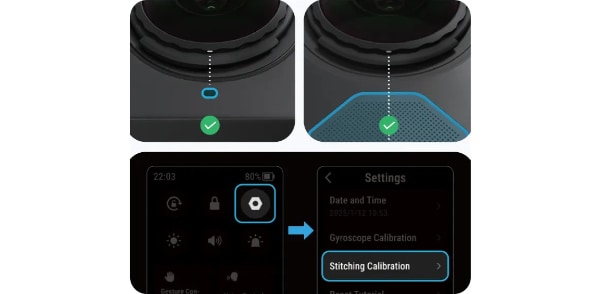
Step 6 - Confirm Installation
The new lens is installed correctly if the lens ring is level with the camera and not misaligned.
If replacing the front lens, the white mark on the lens ring should align with the microphone. If replacing the rear lens, the white mark on the lens ring should align with the centre of the wind guard.
After replacing the lens, use the in-camera Stitching Calibration feature in settings.
Align the orange mark on the lens grip tool with the white mark on the lens ring.
Rotate the lens grip tool twice counter clockwise until the lens ring is loose.
Lift the lens grip tool to remove the lens ring.
Note: If the lens ring slips from the lens grip tool, place it back and ensure the orange and white marks are aligned.
Step 2 - Remove The Lens
Use the removal tool to gently lift the edge of the old lens and remove it.
Note: If the rubber seal around the inner lens comes loose, place it back in its original position before continuing.
Step 3 - Check The Lens Is Clean
Ensure the inner lens is clean from dust, dirt, or debris. If needed, use the included lens blower, brush, cleaning wipes and lens cloth to clean it.
Step 4 - Replace The Lens
Pinch the suction cup with your fingers to pick up the new lens from the lens case and install it.
Step 5 - Install The Lens Ring
Align the lens ring with the camera and rotate the lens grip tool twice clockwise to install.
Remove the suction cup once the lens ring is installed.
Note: Make sure to use the corresponding lens rings for the front and rear camera lenses.
Step 6 - Confirm Installation
The new lens is installed correctly if the lens ring is level with the camera and not misaligned.
If replacing the front lens, the white mark on the lens ring should align with the microphone. If replacing the rear lens, the white mark on the lens ring should align with the centre of the wind guard.
After replacing the lens, use the in-camera Stitching Calibration feature in settings.
You may also like...


You won’t get it cheaper. Our Price Match Promise.
Find it cheaper at any major motorcycle accessory retailer, online or in-store and we‘ll match it.
How to request a price match.